Account Creation
Accounts can be created in many ways:
- Manual creation — This option allows you to add accounts on an individual basis. Enter a user’s first name, last name and email address.
- Creation by invitation — This option allows you to add multiple accounts using users’ email addresses. It’s the best way to create a dozen or so accounts in one effort. Invitation messages will be sent immediately.
- Creation by importing a list — This option allows you to add accounts by importing a list. This option is exclusive to Antidote Web, allowing you to easily create a large number of user accounts at once. Sending the invitation email requires an additional step.
Tips — If your organization has recently acquired Antidote Web and you need to create accounts, read the Organization Deployment Guide for Antidote Web for easy instructions in three simple steps. — You can also create accounts through SAML authentication (beta) and automated provisioning (beta).
Manual creation
If you are an administrator or technician for your organization, you can add an account with the following steps:
- Open the Users tab (A) in your Organization Client Portal.
- Click Add users (B).
- Select Create a new user from the drop-down menu.
- Fill out the form.
- Check the box if you wish to send an invitation immediately.
- Click Add.
-
 AB
AB
Tip — The optional field Unique Identifier allows you to link an ID of your choosing to the account, such as a permanent code or an employee number.
Creation by invitation
If you are an administrator or technician for your organization, you can add one or more accounts in one effort with user emails. Those invited will fill in the missing information themselves. To do this, take the following steps:
- Open the Users tab (A) in your Organization Client Portal.
- Click Add users (B).
- Select the Invite users by email option in the drop-down menu.
- Enter the email addresses of those you wish to invite and separate the emails with commas.
- Select the options to assign users one of the available roles and link them to a product subscription.
- Click Invite and an invitation will be sent automatically.
Tip — To create a large number of accounts by assigning each one an Unique Identifier, we recommend that you use the creation by importing a list.
Creation by importing a list
Importing accounts allows the bulk creation of users from a list. This function is only offered with Antidote Web and can only be used by administrators and technicians. It is particularly useful for educational institutions or large businesses that wish to provide hundreds of people with access to a product.
File templates
Begin by downloading the file templates in Excel or CSV format. These can also be accessed by clicking on Add users (B) and selecting Import a list. You can change the order of the columns, but the headers must not be modified: the system uses the name of each column to determine the type of content in its cells. The import file must contain the following headers:

Below follows some information about filling in the file:
- Unique Identifier (optional) — A unique identifier can only be assigned to an account for an organization. It must consist of alphanumeric characters. You can use it to link a unique identifier to the account such as a permanent code or employee number.
- First Name — This field must consist of alphanumeric characters (50 maximum).
- Last Name — This field must consist of alphanumeric characters (50 maximum).
- Email — This field must consist of alphanumeric characters (100 maximum) in the format of a valid email address.
- Antidote Web — This field is used to grant access to a subscription using one of the following values:
Subscription Value to enter Antidote Web — English english Antidote Web — French french Antidote Web — Bilingual bilingual If the cell is left empty or contains an invalid value, the account will be created without access to Antidote Web.
- Language — This field is used to set a user’s language of correspondence. To enter a language, use the value “en” for English or “fr” for French. If the cell is left empty, the language chosen by the person responsible for the organization will be set by default.
- Role — This field is used to indicate the role in the organization to which the user is assigned. It contains one of the following values: “administrator”, “technician”, “supervisor” or “user”. If the cell is left empty, the default value “user” will be assigned.
- Remove? and Delete? — These fields are used to edit the list of users as part of an update by import. Leave these cells empty or enter “no” to create new users.
- Groups — This field is used to add the user to one or more groups. Enter the name of an existing group or create a new group. The name of a group can contain a maximum of 200 alphanumeric characters. To add a user to multiple groups, list the groups using a comma as a seperator. If the name of a group includes a comma, add a backslash (“\”) in front of this comma (The white, red and blue => The white\, red and blue). It is not possible to remove a user from a group from this file.
Importing a list
Once your import file is ready, follow the steps indicated below to upload your data using the Users tab (A) in your Organization Client Portal.
- Click Add users (B).
- Select Import a list from the drop-down menu.
- Click Choose a file and select your list.
- Click Process the data to begin importing.
You will receive an automatic email informing you of the outcome of the import operation once the data has been processed. If the list is very short, your report may be accessible directly in the interface within a few seconds. Once the import is finished, you can proceed to the next step of sending invitation messages.
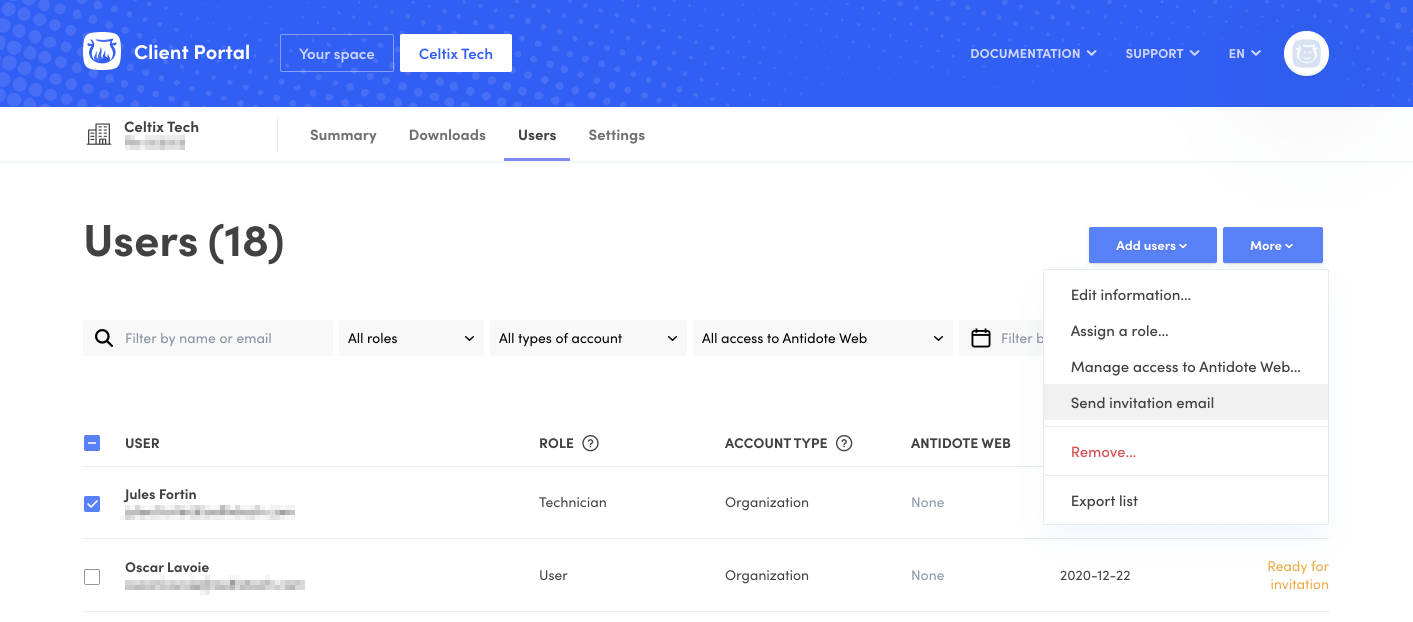
Sending invitations
If you are an administrator or technician for your organization, you can send users an invitation email allowing them to access their Client Portal and its products and subscriptions.
The operation can be completed in a few simple steps:
- Open the Users tab (A) in your Organization Client Portal.
- Check the boxes of the users you wish to invite (C). Use the search field or the filters under the title to make it easier to select users.
- Click on the More button (D) then select Send invitation email (E).
The invitations will be sent immediately.
-
 ACDE
ACDE